In a busy veterinary clinic, knowing where every patient is in their visit journey shouldn't require walking the hallways or shouting across the practice. Yet many clinics still rely on verbal handoffs, whiteboards, or mental tracking to manage patient flow—leading to bottlenecks, communication gaps, and frustrated teams.
The Flowboard method brings visual workflow management to veterinary practice, showing your entire patient flow at a glance and transforming how teams coordinate care.
What is a Flowboard?
A Flowboard is a visual, Kanban-style board that displays all active patients in columns representing their current status in the visit workflow.
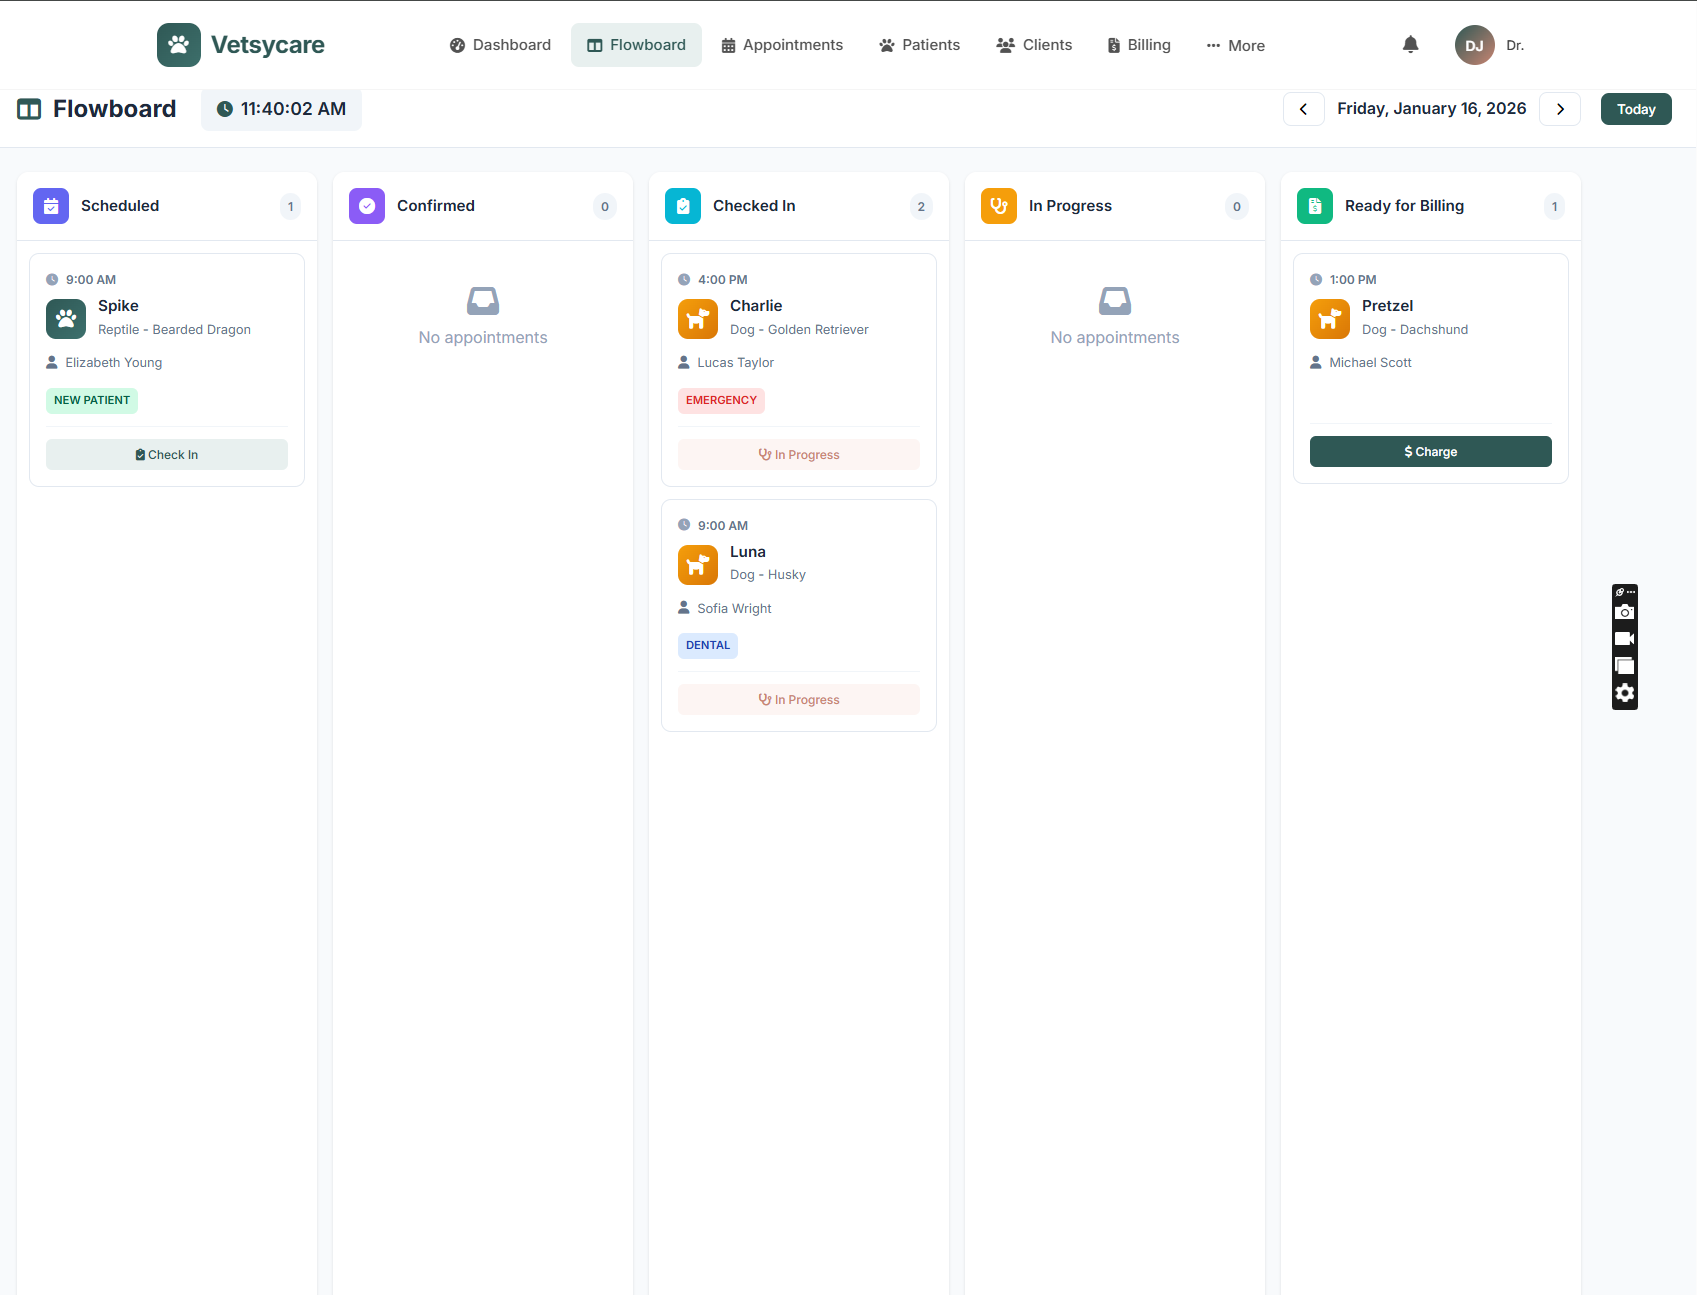
Instead of text-heavy appointment lists, you see patients as cards that move across the board as they progress through their visit:
9:00 AM - Wellness
Waiting - Vaccines
Dr. Smith - Room 2
Labs pending
Discharge ready
Why Traditional Appointment Lists Fall Short
Most veterinary software shows appointments as a chronological list. This creates problems:
- No status visibility: A list shows who's scheduled, not where they are now
- No flow awareness: Can't see bottlenecks forming (5 patients waiting for labs)
- Communication gaps: "Is Max in a room yet?" requires asking or walking to check
- Missed handoffs: Patient ready for discharge but front desk doesn't know
- No workload balance: Hard to see which team members are overwhelmed
The Flowboard Workflow Stages
A well-designed Flowboard typically includes these stages:
1. Scheduled
Upcoming appointments that haven't arrived yet. Shows who's expected and when.
2. Confirmed
Appointments where the client has confirmed they're coming. Reduces uncertainty about no-shows.
3. Checked In
Patient has arrived and is in the waiting area. Clock starts for wait time tracking.
4. In Exam Room
Patient has been roomed. Shows which room and which veterinarian.
5. In Treatment / Procedure
Patient is in treatment area for procedures, labs, imaging, etc. Can include sub-statuses.
6. Waiting for Results
Exam complete, awaiting lab results or other diagnostics before discharge.
7. Ready for Discharge
All care complete, patient ready for checkout and release. Signals front desk.
8. Completed
Patient has checked out and left. Archived for the day.
How Flowboard Improves Clinic Efficiency
Everyone Knows Everything (That They Need To)
With a Flowboard displayed on monitors throughout the clinic:
- Front desk sees who's arrived and who's ready for checkout
- Veterinarians see their patients and room assignments
- Technicians see who needs vitals, labs, or treatment
- Management sees overall flow and can address bottlenecks
Identify Bottlenecks in Real-Time
When you see 6 patients stuck in "Waiting for Results" you know:
- Lab is overwhelmed—need to help or adjust expectations
- Results are back but not reviewed yet—reminder to check
- Process issue that needs addressing
Reduce Verbal Handoffs
Instead of:
- "Dr. Smith, the Cooper family is in room 2"
- "Is Luna done with her x-rays?"
- "Who's waiting the longest?"
Everyone just looks at the board.
Improve Client Experience
Faster identification of ready patients means:
- Shorter wait times in lobby
- Proactive updates ("Your results are almost ready")
- Smoother checkout process
Using Flowboard: Daily Workflow
Morning Setup
Day begins with all scheduled appointments in the "Scheduled" column. Staff can see the full day at a glance.
As Patients Arrive
- Front desk drags patient card from "Scheduled" to "Checked In"
- Card shows check-in time; wait tracking begins
- Technician sees new arrival and prepares to room patient
During the Visit
- Technician moves card to "In Exam Room" when patient is roomed
- Veterinarian sees patient assigned to their color/section
- If patient goes to treatment, card moves to "In Treatment"
- Notes or alerts can be added to the card for team awareness
Discharge
- Veterinarian moves card to "Ready for Discharge" when care is complete
- Front desk sees the card appear, prepares invoice
- Patient is called for checkout without delay
- Card moves to "Completed" after departure
Flowboard Best Practices
Display Boards Strategically
Mount monitors where teams naturally look:
- Front desk area (shows arrivals and discharges)
- Treatment area (shows incoming and waiting patients)
- Break room or common area (general awareness)
Color Code for Clarity
Use color coding for quick visual scanning:
- By veterinarian (Dr. Smith = blue, Dr. Jones = green)
- By appointment type (wellness = green, sick = yellow, surgery = red)
- By urgency (routine = normal, urgent = highlighted)
Keep It Updated
Flowboard only works if everyone updates status promptly. Make it part of workflow:
- Room a patient → update the board
- Finish exam → update the board
- Results ready → update the board
Use Wait Time Indicators
Good Flowboards show how long patients have been in each stage:
- Green: Within expected time
- Yellow: Approaching threshold
- Red: Exceeding acceptable wait
Flowboard vs. Traditional Whiteboards
| Aspect | Physical Whiteboard | Digital Flowboard |
|---|---|---|
| Visibility | Only visible at board location | Visible on any screen, anywhere |
| Updates | Manual—walk to board, erase, rewrite | Click/drag from any workstation |
| History | Erased daily, no record | Logged with timestamps |
| Wait Time Tracking | Manual calculation | Automatic with alerts |
| Patient Info | Name only (space limited) | Name, reason, alerts, notes |
| Analytics | None | Flow reports, bottleneck analysis |
Measuring Flowboard Impact
Track these metrics to measure workflow improvements:
Cycle Time
Average time from check-in to discharge. Target: Reduce by 10-20%.
Wait Time by Stage
How long patients spend in each status. Identify where delays occur.
Throughput
Patients processed per day. Improved flow often enables more appointments.
Client Satisfaction
Survey scores often improve with reduced waiting and smoother experience.
Staff Satisfaction
Less chaos, better coordination typically improves team morale.
Implementing Flowboard in Your Practice
Week 1: Setup
- Configure your workflow stages (customize to your process)
- Set up display monitors if using shared screens
- Create color coding and alert rules
Week 2: Training
- Walk through Flowboard with entire team
- Define who updates status at each stage
- Practice moving cards through workflow
Weeks 3-4: Adoption
- Use Flowboard alongside existing methods
- Identify and address friction points
- Celebrate wins and improvements
Ongoing: Optimization
- Review flow analytics monthly
- Adjust stages or alerts based on actual patterns
- Continue refining workflow based on data
See Every Patient's Journey at a Glance
VetSyCare's Flowboard gives your team visual, real-time patient flow management. Drag-and-drop status updates, wait time tracking, and automatic notifications keep everyone coordinated.
Start Your Free TrialFrequently Asked Questions
Do I need special hardware for Flowboard?
No special hardware required. Flowboard works on any computer, tablet, or phone with a web browser. For shared displays, a standard TV or monitor with an inexpensive streaming device works well.
How long does it take for the team to adopt Flowboard?
Most teams become comfortable within 1-2 weeks. The visual nature makes it intuitive. The key is consistent use—once the team sees the benefits, adoption accelerates.
Can I customize the workflow stages?
Yes. Good Flowboard systems let you define your own stages to match your practice's actual workflow. Some clinics need more stages, others fewer.
What if someone forgets to update the board?
Build updates into existing habits—when you room a patient, update status. Most systems also have reminders when patients have been in a stage too long.
Does Flowboard work for multi-location practices?
Yes, each location has its own Flowboard while management can view all locations from a central dashboard.